Introduction
Coming into this project I had very little knowledge of what projection mapping is. I had it in my head that it was all a grand spectacle, like the Queen’s Jubilee or the Sphere in Las Vegas. What I didn’t even consider were the smaller exhibitions, like concerts or even in museums. I feel, much with every project since beginning this course, I was very intimidated by the whole concept, coming up with an idea for a project, and putting it all together. What I realized after tutorials is that I do this type of “construction” for a living, essentially. I compile images to layer them together
and make them make sense on an unusual canvas. I have decided to take inspiration from one of the first large scale pieces I did as a tattoo artist. Nine years ago, I “graduated” from my apprenticeship program and was thrown to the wolves with a massive thigh piece. This piece took me, if I remember correctly, 4 or 5 sessions to complete. It’s always funny to look back at work from the start of my career and think about how long it took to accomplish the result, and how long it would take me now, which is about half or a third of the time.
My idea has morphed pretty significantly since first learning about this and knowing a deliverable had to come out of it. Initially, I was going to have an open, antique book with the image of Edgar Allen Poe projected on it, with a still image of crows flying out from behind. Then, I thought what if I made the crows move? Or what if Poe popped up from behind the book, like something out of Monty Python? After tutorials, however, I went in a completely different direction and my final idea is to draw inspiration from one of the artists we learned about in class: Yannick Jacquet. I thoroughly enjoyed his piece “Mécaniques Discursives” and am using that as an inspiration for my piece. I like the idea of having still, permanent images with projections around them. Although there is something to be said about the non-destructive element of having a full projection, I also really enjoyed that extra element of having solid pieces and projecting moving images around them. It gives you the option as an artist to completely change the entire feel of piece with projections. For example, I could project unicorns and rainbows around Poe and give him a happier look, but I've decided to stick with the dark side, and project black and red images in the style of trash polka. I think trash polka lends to Poe because he was a bit of a rebel for his time, and definitely not someone who bent to the wills of society.
Research
The first port of call before beginning this project is to understand what it is I’m doing. “Projection mapping is not a new concept; its roots go all the way back to the liquid light shows of the 1960s when projectionists filled trays of inks and paints that created psychedelic visual effects on stages and screens” (Falcon Creative Group). The first thing that comes to mind when hearing this description is images of lava lamp type bubbles projected on a screen. One notable artist during this time was Joshua White. He seemingly pioneered this form of projection.

He used various liquids to create this immersive experience in concert halls and other venues. "By rear projecting multiple overlapping light sources, Joshua White and his collaborators created a kind of live collage that turned the concert hall into an
immersive environment. The projection shown here is a typical example of an improvised manipulation of oil, water, and glycerin dating from around 1967. During the concerts, films of such improvisations were often combined with live light performances and color slide images projected from multiple carousels.“ (MoMA).
The first public display of projection mapping was in 1969 when Disney used the technology as part of their Haunted Mansion ride at Disney land. The ride comprised of numerous spooky optical illusions, including 5 singing busts known as the ‘Grim Grinning Ghosts’. The Ghosts would appear to sing the theme tune thanks to the use of projection mapping, videos of actors singing were projected onto the busts which made them look as if they were animated” (Studio Giggle).


During class, we learned about an artist and inventor called Micheal Naimark, who went the extra mile and painted his entire living room white in order to create a surface to project “Displacements”, which was another 10 years on from Disneyland’s foray into projection mapping. There has been a lot of advancement in the realm of projection mapping since that of the 1969 Haunted Mansion, including a technique patented by Disney to project onto 3D surfaces, and an update to the ride in 2004. “In 2005 Oliver Bimber started projecting onto paintings and big companies like Microsoft had begun experimenting with the technology. Since 2005 projection mapping has had an incredible amount of different uses. Most recently to kick off their Christmas campaign Aldi turned to projection mapping to tease their new advert on the side of the buildings” (Studio Giggle).
In recent times, we have seen projection mapping in places such as Paris during the Olympics and the Queen’s Jubilee Celebration. But there are many uses for projection mapping, “In the past couple of years, projection mapping has gained significant popularity, mainly due to social media. Festivals such as the Amsterdam Light Festival, Luma Projection Arts Festival, Burning Man, and the Toronto Light Festival have attracted thousands of people with cell phones who are more than happy to share the awe of the visual spectacle on their social media feeds” (Falcon Creative Group). Most recently, my personal experience with projection mapping, before I even knew what it was, was at GlasGlow. This was a winter event held in the Botanical Gardens right here in Glasgow. There were certainly more examples than what I photographed, but these images were the best. The first is a moon projected as guests walked into the Botanical Garden, emphasizing the event. The second was another moon over a graveyard scene that had amusing gravestones. And the third was what was meant to look like a hot air balloon, but the balloon part was white, and projections of different weather scenarios were projected on it.
Project
For some reason, I have always been inspired by Edgar Allen Poe. He was born in Boston, and pioneered science fiction and horror writing. He was a rebel at a time when rebels were deeply frowned upon. This is why I used trash polka elements. It is a rebellious tattoo style that combines several different styles into one, having elements of realism, surrealism, and text. Going back to what I mentioned in the introduction, Poe played a pivotal role in my career as a tattoo artist. That one piece gave me the confidence as a fresh little "tatter-tot" to tackle bigger, more complex pieces, and introduced me to a style I still use frequently.
First and foremost was compiling the images I would use. I did this exactly how I would if I were working with the client. I simple pulled images from Pinterest and Google. I started with an inspiration photo, which is the first one pictured below. I then found the image of Poe I wanted to use as the base, and then the frame I wanted to put around him. I then compiled various elements I wanted to include within the projection.
The next step is to assemble the various elements that I wanted included. I put the frame and Poe in the center of the digital canvas, which is where he would be in the physical canvas. I used the program I use for work called Procreate. Procreate is neat tool because it was made for artists, by artists. "An artist ever since he could hold a pencil, [James] Cuda was a freelance web designer in Tasmania, the rugged island state off southeastern Australia. He started drawing on an iPad back in 2010, and the experience sparked something in him—the far-fetched idea to develop an app that would help others discover ways of sketching, painting, and illustrating.
The problem was that Cuda only had half the skill set required to pull this off. So it was fortuitous when he met Lloyd Bottomley, a self-taught coder and fellow Tasmanian" (App Store Preview). One of the coolest features that Cuda and his team have come up with is the recording feature. No matter what piece you're working on, Procreate tracks and records each brush stroke, and every change, and whatever else the user does on their canvas. Below is a time-lapse of my process.
The digital element was the easy part. I decided to hand paint the center part of Poe in the frame. I started by figure out the center point of the canvas, which was also visible on my Procreate canvas (not visible in the video above). It basically breaks the canvas into quadrants on what would print on an 8.5"x11" piece of paper. The physical canvas I used was 16"x20", so the dimensions weren't quite exactly double, but close enough to be able to make tweaks when the time came to project. Unfortunately, I painted the frame in more of a circle than an oval, so the cracks didn't project exactly where I wanted them to, but everything else did!
Left is the time-lapse video of me creating the painted aspect. This process took around 2 hours, maybe a little more. But as mentioned above, I free-hand painted the frame, and attempted to do the same with Poe, but opted to take the "easy" way out and use the iPad as a kind of light box and traced over his image.
Right is the final result of the painting portion, along with my reference on the iPad.

The next step was uploading each image into AfterEffects. Left, you can see each layer in the workspace. I named each layer as what they were in order to identify which needed to go where. The tricky part was figuring out the length of each layer. I had some issues with the order of the layers – I wanted the red layers to come in after the black layers, and there were a couple that overlapped, but that was as simple as moving the layers up and down the workspace. Once I got the layers where I wanted them to go, timed, and sized properly, I ran it with the frame and Poe to make sure it all fit properly. I then ran it without the image of the frame and Poe to be sure everything stayed where it was meant to.
The next step was taking the recording into TouchDesigner and figuring out how to project it. This was absolutely the most difficult part for me. For some reason, my brain equated this to math, and let's just say I'm an art student for a reason. Gillian helped me exponentially from where I began, although I'm still struggling with the whole concept, I feel like if I had more time with it I would understand it better. Alas, I accomplished what I set out to do.
Below is a video of finally figuring out what everything would look like projected. The biggest issue I had was figuring out that a black background was't going to project properly, along with some other technical difficulties. With Gillian's help, I was finally able to figure it out.
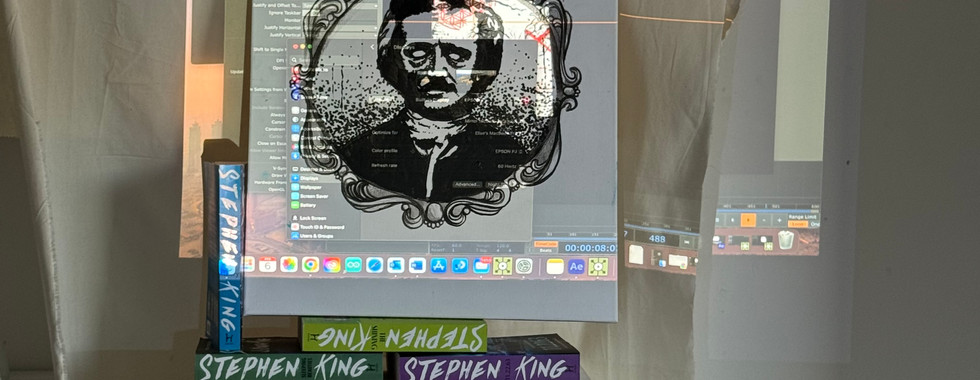
The final step was to come into the studio and do a final set up. Gillian had suggested angling the canvas a bit and maybe having some books around it. I took her advice and chose Stephen King books to place the canvas on. I thought it would be an appropriate choice. I did have some technical difficulties, but with the assistance of some of my colleagues, I was finally able to project and get the project looking exactly how I wanted it to.
Below are photos of the technical difficulties, the set up before the projection, just the black slides of the projection, and then the whole projection.
And the grand finale...


Comments